This article demonstrates how to create simple UI effects in an ASP.NET GridView control using jQuery. These tips have been tested in IE 7 and Firefox 3.
I assume you are familiar with jQuery. If not, please read my article over here before continuing any further: Using jQuery with ASP.NET - A Beginner's Guide. Update - A new version of jQuery has been released. jQuery 1.3.2 can be downloaded from over here: Download Query 1.3
You can also check out my new EBook on using jQuery with ASP.NET called "51 Tips, Tricks and Recipes with jQuery and ASP.NET Controls"
Set up an ASP.NET GridView as you usually do, binding it to a datasource. For demonstration purposes, here’s some sample markup where I am using the Northwind database and a GridView bound to the SQLDataSource to pull data from the database.
<form id="form1" runat="server">
<div>
<asp:SqlDataSource ID="SqlDataSource1" runat="server" ConnectionString="<%$ ConnectionStrings:NorthwindConnectionString %>"
SelectCommand="SELECT [CustomerID], [CompanyName], [ContactName], [Address], [City] FROM [Customers]">
asp:SqlDataSource>
<br />
<asp:GridView ID="GridView1" runat="server" AutoGenerateColumns="False" DataKeyNames="CustomerID"
DataSourceID="SqlDataSource1" AllowPaging="False" AllowSorting="True" >
<Columns>
<asp:BoundField DataField="CustomerID" HeaderText="CustomerID" ReadOnly="True" SortExpression="CustomerID" />
<asp:BoundField DataField="CompanyName" HeaderText="CompanyName" SortExpression="CompanyName" />
<asp:BoundField DataField="ContactName" HeaderText="ContactName" SortExpression="ContactName" />
<asp:BoundField DataField="Address" HeaderText="Address" SortExpression="Address" />
<asp:BoundField DataField="City" HeaderText="City" SortExpression="City" />
Columns>
asp:GridView>
div>
form>
The element in the web.config will look similar to the following:
<connectionStrings>
<add name="NorthwindConnectionString" connectionString="Data Source=(local);Initial Catalog=Northwind;Integrated Security=True" providerName="System.Data.SqlClient"/>
connectionStrings>
Note: In most of the tips shown here, I am using a complex jQuery row ‘filter’ suggested by Karl Swedberg to a user in a jQuery forum. This filter is required due to the fact that a GridView does not render (accessibility tags) a and a by default(read this article of mine to learn how to make the GridView generate a ). For the header, the GridView generates ’s inside . Similarly for the footer, the GridView generates a inside a and so on. Hence it is required to use additional filters to exclude header and footer rows while adding UI effects on the GridView. These tips have been tried out on a GridView where paging is not enabled. When the paging is enabled, the pager however gets highlighted. I am still working on a solution to prevent the UI effects from being applied on the pager. I will update this article, once I find a solution. If you have a solution that works cross browser, please share it with me. 


The link to download the code for all these samples can be found at the end of this article. Let’s see some tips.
1. Highlight an ASP.NET GridView row by clicking on it
This tip lets you highlight a row when you click anywhere on the row. Clicking back on a highlighted row, removes the highlight.
<head id="Head1" runat="server">
<title>Highlight Row on Clicktitle>
<script src="Scripts/jquery-1.3.min.js" type="text/javascript">script>
<script type="text/javascript">
$(document).ready(function() {
$("tr").filter(function() {
return $('td', this).length && !$('table', this).length
}).click(function() {
$(this).toggleClass('currRow');
});
});
script>
<style type="text/css">
.currRow
{
background-color:Gray;
cursor:pointer;
}
style>
head>
After applying the filter on the rows (to prevent the user from highlighting the Header and Footer row), we use the toggleClass to highlight/remove highlight on the row.
Output:
2. Remove/Hide the Highlighted rows of an ASP.NET GridView
If you want to remove/hide the highlighted rows from the GridView, then here’s how to do so. I have added a HTML button control (Button1) to the form
<input id="Button1" type="button" value="Remove Rows" />
The jQuery is as shown below:
<head id="Head1" runat="server">
<title>Hide Highlighted Rows>/title>
<script src="Scripts/jquery-1.3.min.js" type="text/javascript">script>
<script type="text/javascript">
$(document).ready(function() {
$("tr").filter(function() {
return $('td', this).length && !$('table', this).length
}).click(function() {
$(this).toggleClass('currRow');
});
$("#Button1").click(function() {
var hideRows = $("tr").hasClass("currRow");
if (hideRows == true) {
$("tr.currRow").remove();
}
});
});
script>
<style type="text/css">
.currRow
{
background-color:Gray;
cursor:pointer;
}
style>
head>
Here the user first highlights the rows and then clicks on the ‘Remove Rows’ button to remove the highlighted rows
3. Remove/Hide ASP.NET GridView Rows on Mouse Click
In our previous sample, we were following a two step process of first highlighting multiple rows and then removing them. Let’s say if we want to remove the rows as the user clicks on them, then follow this approach:
<script type="text/javascript">
$(document).ready(function() {
$("tr").filter(function() {
return $('td', this).length && !$('table', this).length
}).click(function() {
$(this).remove();
});
});
script>
4. Highlight an ASP.NET GridView row on Mouse Hover
In case you do not want to define a separate style for the row and want to highlight a row on mouse over (instead of the click), follow this tip:
<head id="Head1" runat="server">
<title>Highlight Row on Hovertitle>
<script src="Scripts/jquery-1.3.min.js" type="text/javascript">script>
<script type="text/javascript">
$(document).ready(function() {
$("tr").filter(function() {
return $('td', this).length && !$('table', this).length
}).css({ background: "ffffff" }).hover(
function() { $(this).css({ background: "#C1DAD7" }); },
function() { $(this).css({ background: "#ffffff" }); }
);
});
script>
head>
Output:
5. Drag and Drop Rows of an ASP.NET GridView
This tip comes very handy when you are presenting a set of data in a GridView and want to rearrange rows at runtime. I am using the Table Drag and Drop Plugin for this example and it’s as simple as calling tableDnD() on the table. This plugin enables drag/drop on a table.
<head runat="server">
<title>Drag Drop Rowstitle>
<script src="Scripts/jquery-1.3.min.js" type="text/javascript">script>
<script src="Scripts/jquery.tablednd_0_5.js" type="text/javascript">script>
<script type="text/javascript">
$(document).ready(function() {
$("#GridView1").tableDnD();
});
script>
head>
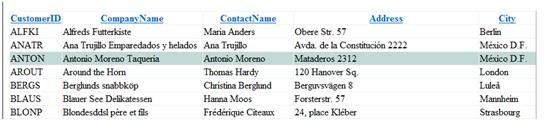
Output:
Before Drag
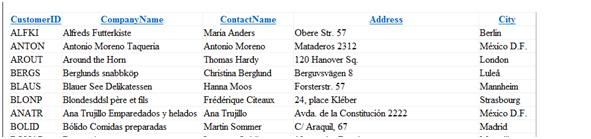
After Drop - dragging row with Customer ID ‘ANATR’ below ‘BLONP’
That’s it for now. We saw some UI tips that can be applied to an ASP.NET GridView using jQuery. Stay tuned to see some more in the forthcoming articles. I am also planning to write an article to store these UI changes when the user paginates through the Grid or a postback occurs.
I hope you liked the article and I thank you for viewing it. The entire source code of this article can be downloaded from here.
Subscribe to:
Post Comments (Atom)
No comments:
Post a Comment