Have you seen pages with a curl in the corner, which on a mouse over, curls further to reveal an image or a page element kept under it? They are also called as ‘Dog Ears’ or ‘Page Peels’.
Although creating them looks like a tedious job, plug-ins like the Sexy Curls jQuery Plugin makes it very simple to add Page Curls to your web pages. In this short article, I will show you how to use this jQuery plug-in to add curls to your existing ASP.NET pages. The same concept can also be applied to an HTML page. Note: Remember not to overuse this feature in your web pages.
As the author Elliott Kember states in his blog, along with the jQuery Library, this plug-in also requires the jQuery UI Resizable module. I am using the jQuery and jQuery UI scripts hosted on Google CDN. However you can always customize your jQuery UI download by selecting only the resizable module from here.
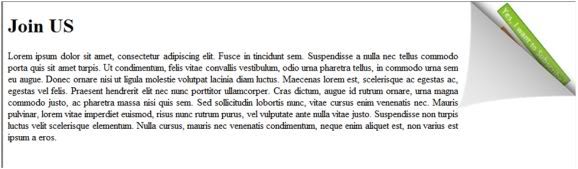
Here’s a screenshot of how the curls look like on a page.
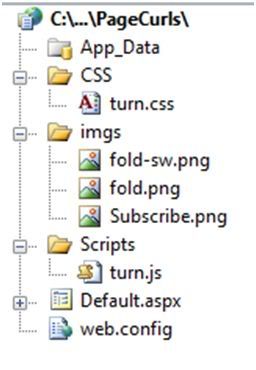
Open an existing ASP.NET website. Download the turn.js, turn.css and fold.png files from here and arrange them in a directory structure, similar to the following:
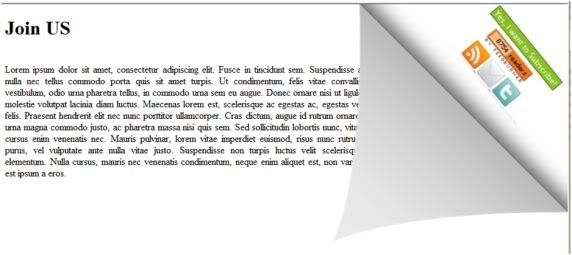
The Subscribe.png is the image that will be kept underneath the Page Curl. You can replace it with any other image of your own.
Now write the following code to add a Curl to your page:
<html xmlns="http://www.w3.org/1999/xhtml">
<head runat="server">
<title>Page Curlstitle>
<script src="http://ajax.googleapis.com/ajax/libs/jquery/1.4.2/jquery.min.js"
type="text/javascript">script>
<script src="http://ajax.googleapis.com/ajax/libs/jqueryui/1.8.1/jquery-ui.min.js"
type="text/javascript">script>
<script type="text/javascript" src="Scripts/turn.js">script>
<link rel="stylesheet" type="text/css" href="CSS/turn.css" />
<style type="text/css">
div{
width: 80%;
text-align:justify;
}
style>
<script type="text/javascript">
$(document).ready(function() {
var opts = {
side: 'right',
directory: 'imgs',
startingWidth: 200,
startingHeight:180,
autoCurl: true
};
$('#target').fold(opts);
});
script>
head>
<body>
<form id="form1" runat="server">
<div>
<h1>Join USh1>
<br/>
<asp:Panel ID="Panel1" runat="server">
Lorem ipsum dolor sit amet, consectetur adipiscing elit. Fusce in tincidunt sem. Suspendisse a nulla nec tellus commodo porta quis sit amet turpis. Ut condimentum, felis vitae convallis vestibulum, odio urna pharetra tellus, in commodo urna sem ……
asp:Panel>
<asp:Image ID="target" runat="server" ImageUrl="imgs/Subscribe.png" />
div>
form>
body>
html>
As you can see, we have set some options and then passed it to the fold() method. The directory option is the folder where you keep the images that create the Curl effect. The autoCurl option enables curl/uncurl when the mouse is hovered over/out of it. If you set the autoCurl option to false, the user has to manually hold the corners to ‘peel’ it off.
That's it. Run the page and on hovering your mouse over the curl, the ‘peeled’ off Curl will look like this:
The code has been tested and works well on the latest browsers.
I hope you liked this short article and I thank you for viewing it. The entire source code of this article can be downloaded over here
No comments:
Post a Comment